
The combination of grays and blacks is a trend that persists season after season. Would you like to have a cool bag made with fabric ribbons? In this tutorial, we’ll show you how to decorate your new bag to use whenever you want.
Materials needed to make a woven bag

- Two-color canvas fabric. We’ve chosen mottled gray and plain black, but you can mix other colors or go for a pattern according to your preferences.
- Cotton fabric for the inner lining (printed or plain)
- 3 meters of Manubens P160 ribbon for the bag or backpack. Choose a color that matches the canvases you’ve chosen.
- Scissors, pins.
- We recommend sewing the bag with a machine.
How to make the fabric bag step by step

1. Prepare the fabrics
- Cut two pieces of gray canvas, each measuring 45 x 45 cm, leaving two 6 x 6 cm squares for the corners, following the scheme.
- Cut two pieces of fabric, each measuring 40 x 40 cm, for the lining, also leaving two 6 x 6 cm squares for the corners.
- Cut two strips of 45 x 6 cm from gray canvas.
- Cut a piece of black canvas measuring 25 x 35 cm for the front pocket.
2. Prepare the bag lining

To make the lining for the bag, face the two pieces of lining fabric and sew them, leaving a 15 cm gap at the bottom to turn the bag inside out when finished.

Turn the fabric inside out.

Attach the reverse side of the canvas strip to the top of the lining and sew the corners.

Once sewn, the lining should look as seen in the image.
3. The exterior part of the fabric bag

Face the two pieces of gray canvas and sew them along the bottom.

Center the black canvas pocket on the front and sew it.
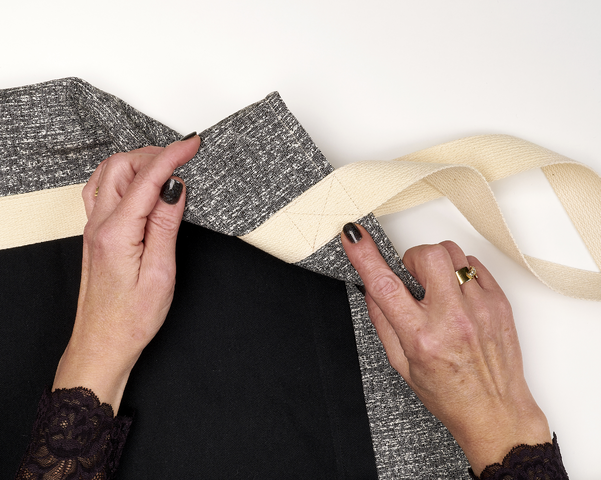
To make the handles for the bag, sew the handle ribbon around the pocket as shown in the image, leaving the handle length you desire. The ribbon should cover all the pocket seams. Leave about 4 cm unsewn at the top.
Sew the handle ribbon on the side without the pocket.

Sew the sides of the bag, press, and join the corners.
Join the reverse sides, canvas and lining.
From the 15 cm opening of the lining, pull out all the fabric. You can iron it a bit if you wish.
Sew the sides of the bag, press, and join the corners.
Join the reverse sides, canvas and lining.
From the 15 cm opening of the lining, pull out all the fabric. You can iron it a bit if you wish.
4. Final touches on the personalized fabric bag

Insert the lining into the bag and sew around.
Finish the bag handles with decorative stitches. It will look nicer and serve as reinforcement to withstand the weight of the bag.

And there you have it, your fabric bag with ribbons for the next season is finished!
With this bag, you can travel, take walks, go shopping, or even head to the beach. If you’re interested in this type of accessory, we also show how to make a small clutch bag for everyday use.
If you decide to try this craft, we’d love to see the result using the hashtag #Manubens on your social media.
Ver esta publicación en Instagram