DIY to create a decorative hoop step by step
Decorating with embroidery hoops remains a current DIY trend. It’s an easy and fun craft that will add a splash of color to any room in your home. It will wonderfully adorn children’s or baby’s rooms. It can even replace the boring corkboard for hanging notes on your desk!
Embroidery hoops are wooden rings that have been used for embroidery throughout history. They serve to stretch the fabric and make needlework easier. But they are also perfect for expressing your creativity by using them as frames for decorative fabrics, creating small pictures with dried flowers, framing lace, or simply displaying your embroideries.
Today, we suggest decorating an embroidery hoop with pieces of ribbon. Didn’t think of that, did you? We’ve chosen linen ribbon, but if you have an idea that doesn’t match these colors, you can also use Petersham cotton ribbon and create the combinations you like.
What will you find in this post?
- Materials you need to decorate embroidery hoops
- How to decorate hoops with ribbons step by step
- Why use decorated hoops in your home decor
- Extra tips for this DIY craft of decorating with hoops
Let’s start by explaining the materials you need and how to decorate hoops with pieces of ribbon.
Materials to decorate hoops with fabric ribbons

To create handmade hoops, you will need:
- Manubens P.320 linen ribbon:
- Color 000: natural
- Color 070: jade
- Color 416: arctic blue
- Color 629: dusty
- Color 638: chestnut
- Color 705: amber
- Embroidery hoops of a small size (we used hoops of approximately 15cm in diameter).
- Fabric of cotton, linen, or cross-stitch.
- DMC embroidery thread
- Scissors
- Needle
2. How to decorate hoops with ribbons step by step

Start by assembling the hoop. Cut the fabric to size.
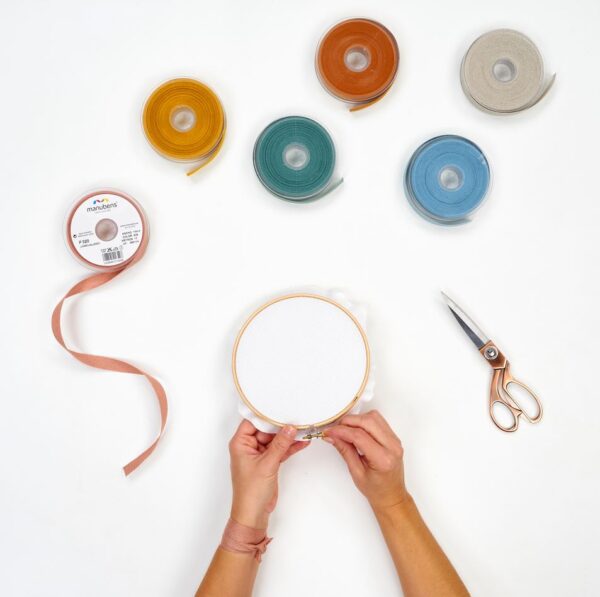
Place it and adjust it well, making sure it is taut.

Trim all excess fabric so that the back is smooth.
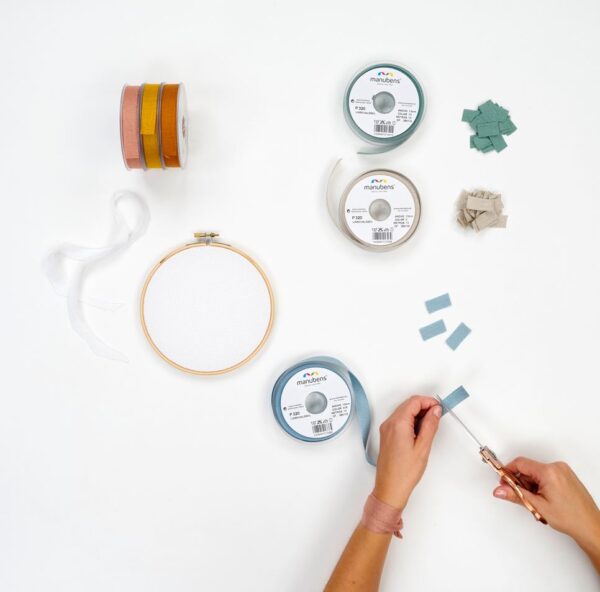
Now that you have the fabric mounted on the hoop, choose the ribbons and color combination you like. Cut pieces of approximately 2.5 cm.

Now it’s time to decorate the hoop. Apply the ribbon pieces always starting from the outer part of the circle. Just place the ribbon and make a stitch with embroidery thread in the center of the ribbon piece. Place them however you like. The more irregular, the better.
In the next photo, you’ll see better what we mean.


Alternate the colors as you like. We did it without following any order and always using the same color thread. It’s so entertaining that time flies!

As you close the circle, mark the center of the hoop with a pin to serve as a guide. Continue sewing ribbon pieces until the filling is complete.
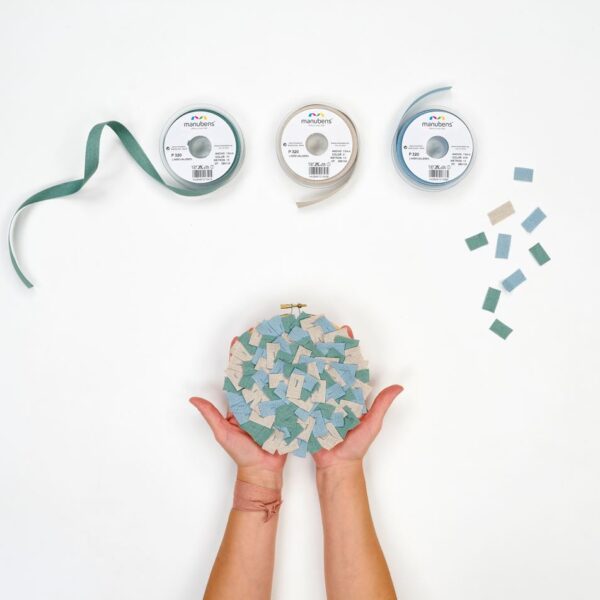
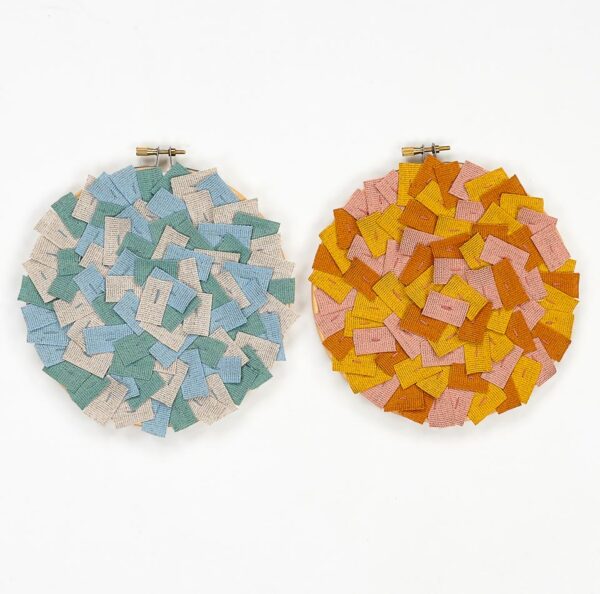
Little by little, the circle is closing, and with the ribbon from the center, ta-da! You now have the hoop decorated with colorful ribbons. Isn’t it beautiful? We love the result, and it couldn’t be easier and more enjoyable. Ready to hang and charm any corner!
3. Why use decorated hoops in your home decor
As we mentioned earlier, decorating with embroidery hoops remains a trend. Just take a look at social media to see the multitude of decorative solutions proposed by DIY enthusiasts.
You probably already know where you’ll place your hoops, but let us suggest some more ideas. For example:
- To decorate the wall of a child’s or baby’s room.
- In the kitchen, to have all the lists we usually keep at home at hand: the grocery list, school menus… and declutter the fridge door!
- In front of your desk, to add a pop of color to your study and replace the boring corkboard.
- Have you considered decorating any wall in the dining room or living room? You’ll surely find the perfect spot to showcase your hoops.
4.Extra tips for this DIY craft of decorating with hoops
Some crafts for decoration have the disadvantage of maintenance. Over time, they gather dust and lose their original appeal.
We’ve also thought about that and proposed materials for this craft that can be hand-washed and even ironed! You just have to disassemble the fabric from the hoop, wash it, let it air dry, and, if necessary, give it a touch of iron before putting it back together. And your decorated hoop will always look like the first day!
Want more ideas for decorating hoops? Don’t miss our proposal “Easy Dreamcatchers: Special DIY for Kids.” It’s a craft to learn crocheting easily and enjoyably. If you haven’t started this activity yet, ask your haberdashery supplier for advice. They’ll surely be happy to guide you! Even though it’s not difficult at all, you’ll see.
We would love to see your decorated hoops when you have them finished and placed in your home. Share your photos on social media with the hashtag #manubens and be part of our community.
You can also subscribe to our blog to receive directly in your email the fantastic ideas we propose with our ribbons! Are you up for it?